
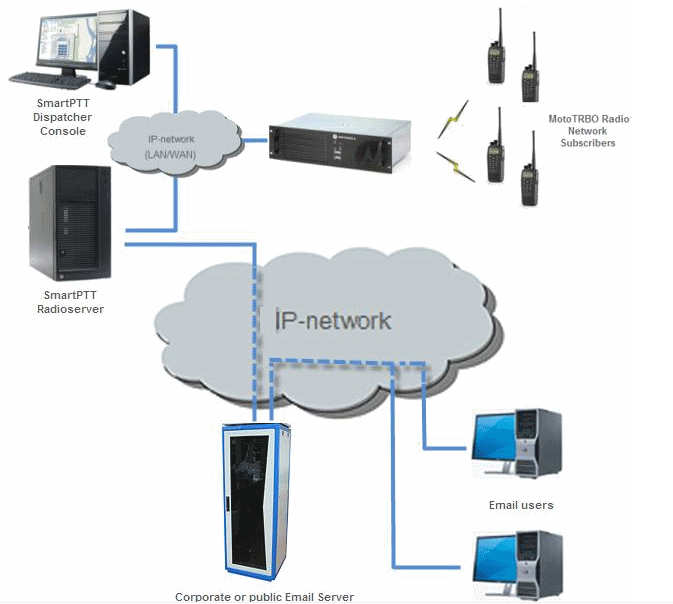
Email gateway provides the ability to exchange digital messages between e-mail users and MOTOTRBO radio network subscribers. The following scheme displays how it is done.
To be able to exchange email messages between radio subscribers and email users you need:
- Create and configure email account.
- Configure the radioserver.
Create and Configure Email Account
First of all, create your email account, if you do not have one. This section describes how to do it as well as how to configure it properly.
- Create your email account. You can use your corporate email server or any other server. In this example we are using com.
- In the settings of the newly created email account specify all the necessary parameters.
- In the settings of the email account in the Forwarding and POP/IMAP tab select the following items:
- Enable POP for all email (even mail that has already been downloaded).
- Enable IMAP.
- Save changes.

- If you have an email client (for example, Microsoft Outlook), for the outgoing messages you need the following settings:
- Use plain text as message format.
- Use Unicode (UTF-8) for outgoing images (with Base64 encoder).
Configure SmartPTT Radioserver Settings
The radioserver configuration includes the following steps:
- Configure email gateway (activate email gateway, choose the direction of text message sending).
- Setup POP3/IMAP4 protocols for sending text messages.
Email Gateway Configuration
Select Email Gateway in SmartPTT Radioserver Configurator.

Select the Active check box to enable the email gateway service.
Forward Messages to E-mail – select to enable message forwarding from radio subscribers to the email addresses specified in the Recipients list.
Note: When a radio subscriber sends a text message to another radio subscriber, all email users whose emails are given in the Recipients list will receive 1 or 2 text messages: the first one with the confirmation that the message was sent and the second – with the confirmation on delivery.
Sender Name – specify domain name, in the name of which all email messages will be sent (for example, smartptt.com).
Recipients – list of email addresses to receive forwarded text messages.
Enable Direct Message Delivery from Radio Network – forwarding mail messages directly from radio subscribers.
Enable Direct Message Delivery to Radio Network – forwarding mail messages directly to radio subscribers.
Receive protocol – select protocol for email message receiving (POP3 or IMAP4).
Split Long Messages – if not selected, a long E-mail message, i.e. a message that contains more characters than allowed in one message in the radio network, addressed to a radio is trimmed to not exceed the limit (some information will be lost). If selected, the original message is split into several packages during transmission. Thus, the radio subscriber receives the message without information loss.
Sender ID – when selected, the received message contains the sender e-mail address.
Ignore After Line — ignore everything after a certain string in the received e-mail message.
Example:
The original e-mail message: Due to technical works on the PBX, the PI will have no telephony for the whole day.To turn off these notifications, open Personal Settings, click Manage Alerts. Clear check boxes next to unwanted notifications.
If you enter To turn off in the Ignore After Line field, the radio subscribers will receive the message: Due to technical works on the PBX, the PI will have no telephony for the whole day.
POP3 Protocol Configuration
In the Receive Protocol field, select POP3 and click Settings in the left setting tree.

SMTP server – domain name of the SMTP server which is used for delivering outgoing email messages (for example, smtp.gmail.com).
Port – SMTP server port number.
Use SSL – check this option if you need secure connection to SMTP server.
Authentication – select authentication method for SMTP server (Anonymous – connect anonymously, Windows – connect to the server under Windows user account, Login/Password – connect with Login/Password specified).
Login – email address or login required by the mail server.
Password – user’s password.
Send test message – click the button to check server connection. In case of successful connection and correct settings, the mail user specified above will receive a test email message.
POP3 server – specify domain name of POP3 server which is used to deliver incoming e-mail messages.
Port – enter POP3 server port number.
Use SSL – check this option if you need a secure connection to POP3 server.
Authentication – select authentication method for POP3 server.
Login – enter email address or login required by mail server.
Password – user’s password.
Polling Delay – polling interval for the mail server.
Check connection – click to check connection with the server. In case of successful connection, the pop-up window message shows the number of unread email messages in your email box. In case of connection failure, a window with connection error message opens.
IMAP4 Protocol Configuration
Select "IMAP4" in the drop-down list of Receive protocol and click Settings.
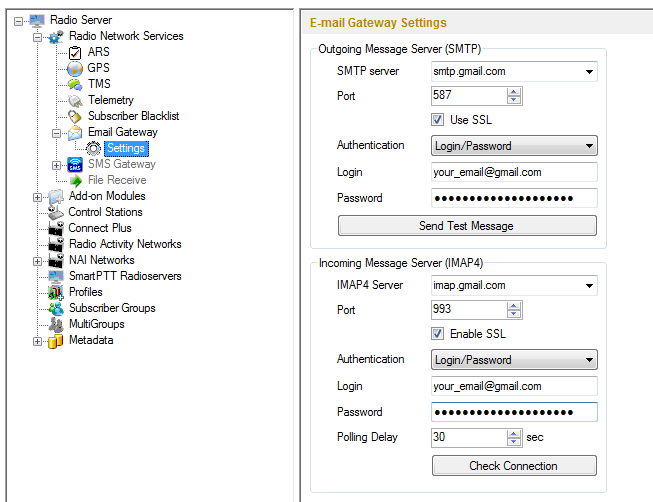
IMAP4 server – specify the domain name of IMAP4 server which is used for incoming email messages delivery.
Port – enter IMAP4 server port number.
Use SSL – check this option if you need secure connection to IMAP4 server.
Authentication – select authentication method for IMAP4 server.
Login – enter email address or login required by mail server.
Password – user’s password.
Polling Delay – polling interval for the mail server.
Check connection – click the button to check connection with the server. In case of successful connection, the pop-up window shows the number of unread mail messages in your email. If connection is failed, connection error window opens.
Supported Message Formats
When sending an email message to radio subscribers, use the following format of the message.

: – prefix indicating that this message is addressed to a radio subscriber or talkgroup.
<ID|IP> – ID or IP address of the radio subscriber or subscriber group.
Space indicates the beginning of the message body.
Use the Split Long Messages option to guarantee that a message won't be cut.
Example:
- The email message :12.0.0.77 Hello! or :77 Hello! received from the mail server will be forwarded to the radio subscriber with ID 77.
- The email message :225.0.0.1 Please, call to the station received from the mail server will be forwarded to the subscriber group with ID 1.
- The email message :12.0.0.80,12.0.0.81,12.0.0.82,12.0.0.50 Hello! or :9080,9081,9800,9050 Hello! received from the mail server will be forwarded to the radio subscribers with corresponding IDs.
When sending a text message from a radio subscriber to an email user, use the following format.

: – prefix indicating that this message is addressed to an email user.
<email_address> – email address of the email user.
Space indicates the beginning of the message body.
Example:
- The message :email_address@example.com Hello! from a radio subscriber will be forwarded to the email user with the email address email_address@example.com.
- The message :email_address1@example.com,email_address2@example.com Hello! from a radio subscriber will be forwarded to the email users email_address1@example.com and email_address2@example.com.
Note 1: When Forward Messages to E-mail is enabled together with the options of receiving messages from radio network and from the email, all messages sent or received by email users will be duplicated to the specified email addresses.
Note 2. Troubleshooting: If you configure E-mail Gateway as described above, though you get errors when trying to send Test email or when pressing Test connection button, then check that applications are allowed to connect to email account.
For Gmail accounts, enable Less secure apps setting.
https://myaccount.google.com/lesssecureapps
In case two-step verification is enabled:
To enable application passwords, follow these steps.
Application passwords allow you to access your account on devices that do not support two-step authentication. You only need to enter this password once.
Using Gmail as an example, you need to open your Account Settings, then navigate to Security, Two-step Verification, and finally Application Passwords.
When you create an application password in these settings for an app like SmartPTT, the system will generate a token/password. You will then need to enter this token/password in the Email Gateway Configurator when setting up the email gateway.
Comments